Most Framer sites ship a simple “Contact us” form that treats every submission the same.
That’s fine when you’re just starting - but once you get any real traffic, your inbox becomes a mix of:
- spam
- low-intent inquiries
- high-intent leads that deserve a fast reply
This short guide covers:
- Evidence-backed best practices for lead forms (so you don’t accidentally tank conversion)
- A DIY Framer workflow to qualify + route leads to Slack/email without standing up a backend
- An optional turnkey implementation with a Framer plugin if you want fewer moving parts
Part 1 - What “good” lead forms do
Keep the form short (then qualify later)
A consistent theme across conversion research is that more fields = more friction.
HubSpot analyzed landing pages and has multiple writeups showing certain fields (e.g. phone number, long free-text, etc.) can hurt conversion. A good starting point is 3-5 fields, then qualify later via routing logic or a follow-up step.
- HubSpot: Which Types of Form Fields Lower Landing Page Conversions? https://blog.hubspot.com/blog/tabid/6307/bid/6746/which-types-of-form-fields-lower-landing-page-conversions.aspx
Use progressive disclosure (multi-step) when you need more info
If you need more than a few inputs, split the form into steps.
Multi-step forms often outperform long single-page forms because they reduce “whoa that’s a lot” abandonment.
- Reform (research summary): https://www.reform.app/blog/research-how-layout-affects-form-completion-rates
Optimize for speed-to-lead
If a lead fills out your form and you reply hours later, you’re usually competing with whoever replied first.
A widely cited lead response study (InsideSales/MIT) found that contacting leads quickly dramatically increases qualification odds.
- Lead Response Management Study (PDF): https://cdn2.hubspot.net/hub/25649/file-13535879-pdf/docs/mit_study.pdf
Practical takeaway: route high-intent leads to Slack so you see them immediately.
Part 2 - What we’re building (DIY version)
A lead qualification form that:
- asks 3-5 qualifying questions
- uses a simple rule like “Budget = $20k+ AND Timeline = This month”
- routes high-intent to Slack
- routes everything else to a fallback email
No custom backend required.
Part 3 - DIY: implement this in Framer
Framer handles the form UI. The routing happens via email (simple) or webhooks + automation (recommended).
Option A - Email-first (simplest)
Best when you want something you can set up in minutes.
In Framer
- Insert a Form (Insert → Forms → Form).
- Add inputs and keep them tight:
- Name
- Budget (dropdown)
- Timeline (dropdown)
- 1-sentence project description (short textarea)
- In the right sidebar, find Send To → click Add… → choose Email.
- Enter the email address you want submissions to go to.
- Publish and submit two tests (one “high intent”, one “low intent”).
In your email inbox (routing without automation)
- Create a rule/filter like:
- If subject/body contains
Budget: $20k+ANDTimeline: This month→ label/folder “Hot Leads” - Else → label/folder “General”
- If subject/body contains
This isn’t “instant Slack,” but it’s already a big upgrade over a single noisy inbox.
Option B - Slack + Email routing via webhooks (recommended)
This is the “real routing” setup: Framer sends each submission to a webhook, and Make/Zapier routes it.
Step 1 - Create a webhook trigger (Zapier or Make)
Zapier
- Create a new Zap.
- Trigger: Webhooks by Zapier → event Catch Hook.
- Copy the webhook URL Zapier gives you.
Make (Integromat)
- Create a new Scenario.
- First module: Webhooks → Custom webhook.
- Click Add to create a webhook and copy the generated URL.
Step 2 - Connect your Framer form to that webhook
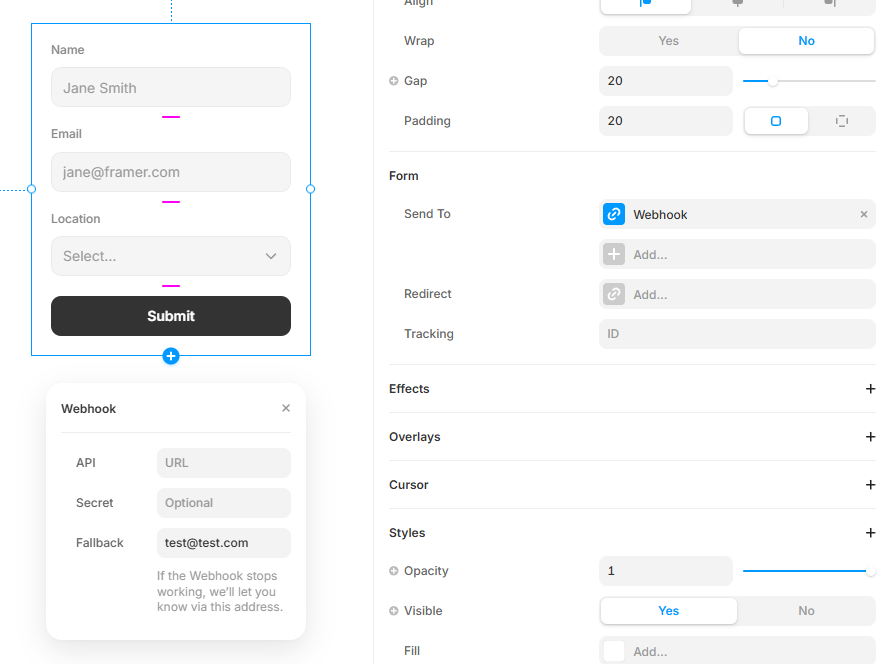
- Select your Form on the Framer canvas.
- In the right sidebar, next to Send To, click Add… → choose Webhook.
- Paste the webhook URL from Zapier/Make.
 4. Publish and submit a test.
Framer sends the submission as JSON via HTTP POST (docs): https://www.framer.com/help/articles/framer-form-webhook-setup/
Step 3 - Add the routing logic (equal detail: Zapier vs Make)
Zapier routing
- Add a step: Filter by Zapier
- Condition example:
budgetequals$20k+ANDtimelineequalsThis month
- Condition example:
- If the filter passes: add action Slack → “Send Channel Message” (to
#inbound-leads)- Include the lead details + a link back to the page they submitted on.
- Add a second path (or a second Zap) for everything else:
- Action Email by Zapier (or Gmail) → send to your fallback inbox.
Make routing
- After the webhook module, add a Router.
- Route 1 (“Hot Leads”) filter:
budget = $20k+ANDtimeline = This month- Action: Slack → “Create a Message” in
#inbound-leads
- Route 2 (fallback):
- no filter (or inverse filter)
- Action: Email/Gmail → send to your fallback inbox (or log to Google Sheets).
Part 3b — Setting up Slack and Discord for routing
Once you have a webhook URL from Zapier or Make, you still need the destination webhook URLs. Here’s how to get them.
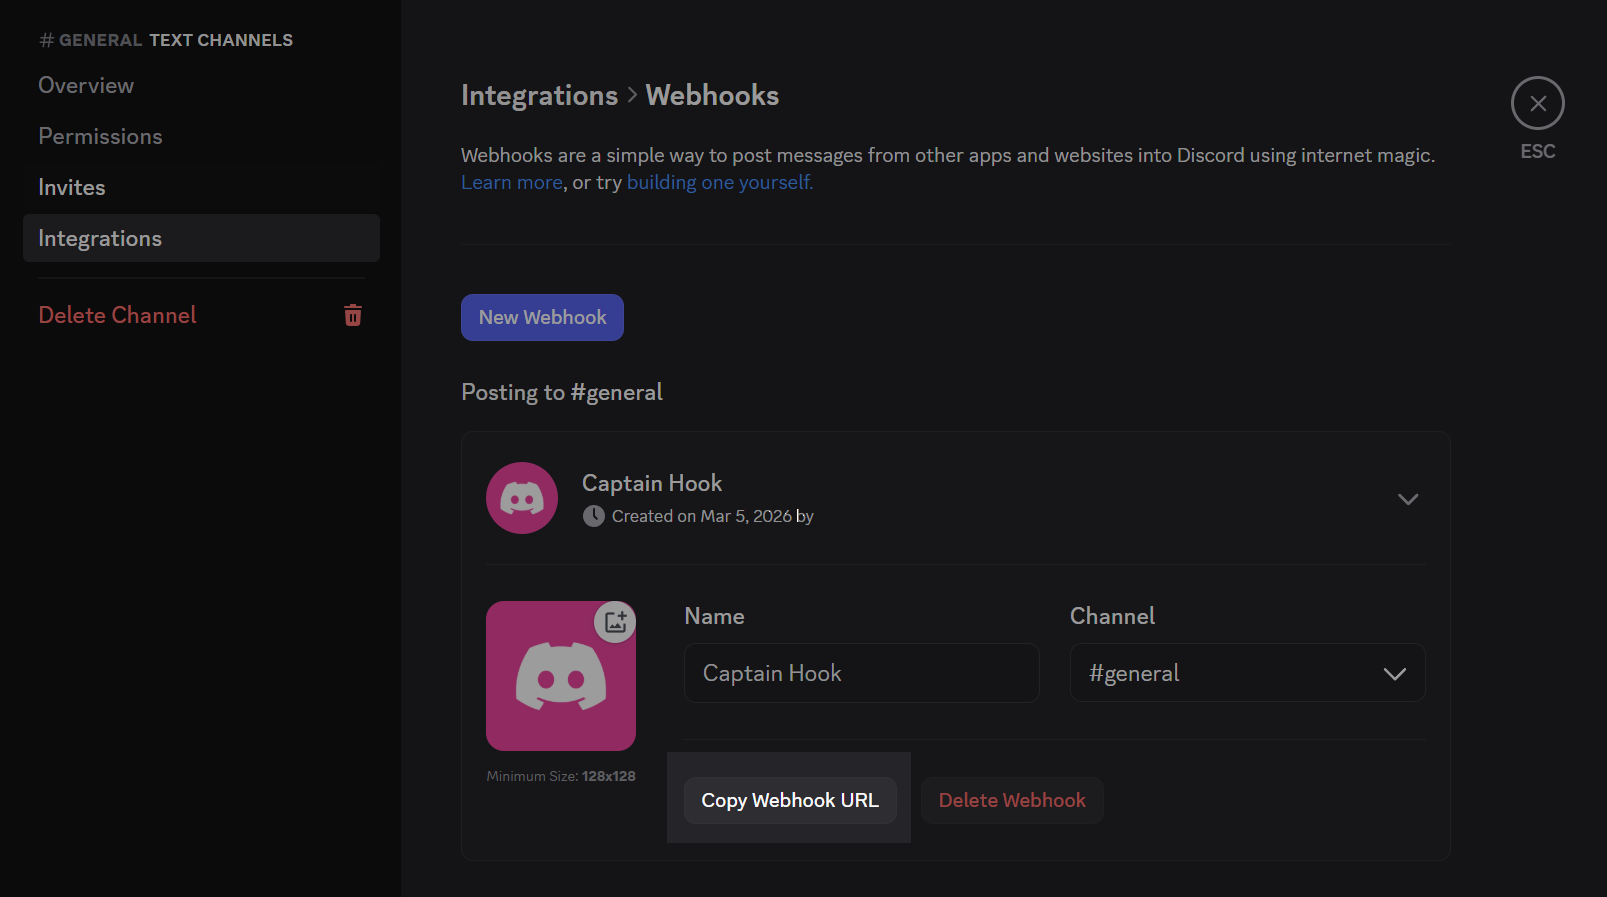
How to set up a Slack incoming webhook
Slack incoming webhooks are per-channel URLs that accept a JSON POST and display a formatted message — no bot token required.
- Go to api.slack.com/apps and click Create New App → From scratch.
- Give it a name (e.g. “Lead Routing”) and select your workspace.
- In the left sidebar under Features, click Incoming Webhooks.
- Toggle Activate Incoming Webhooks to On.
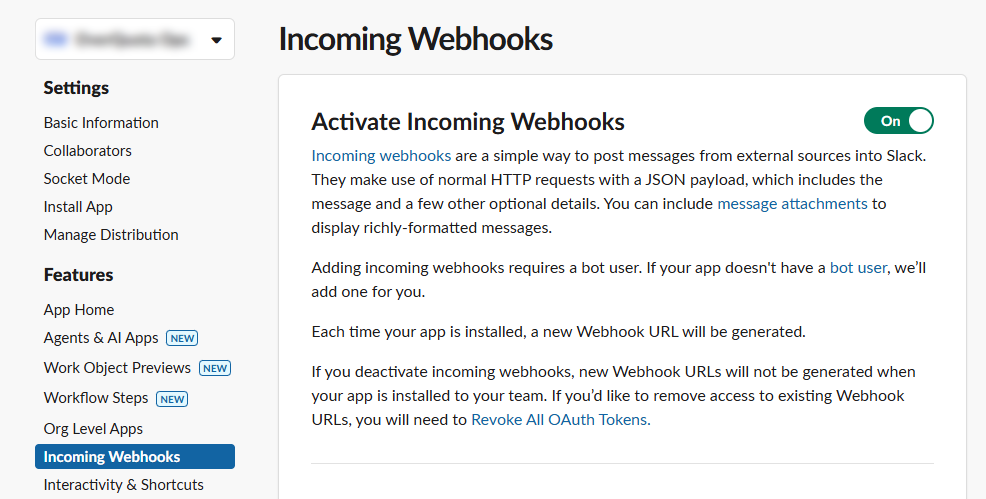
- Click Add New Webhook to Workspace at the bottom.
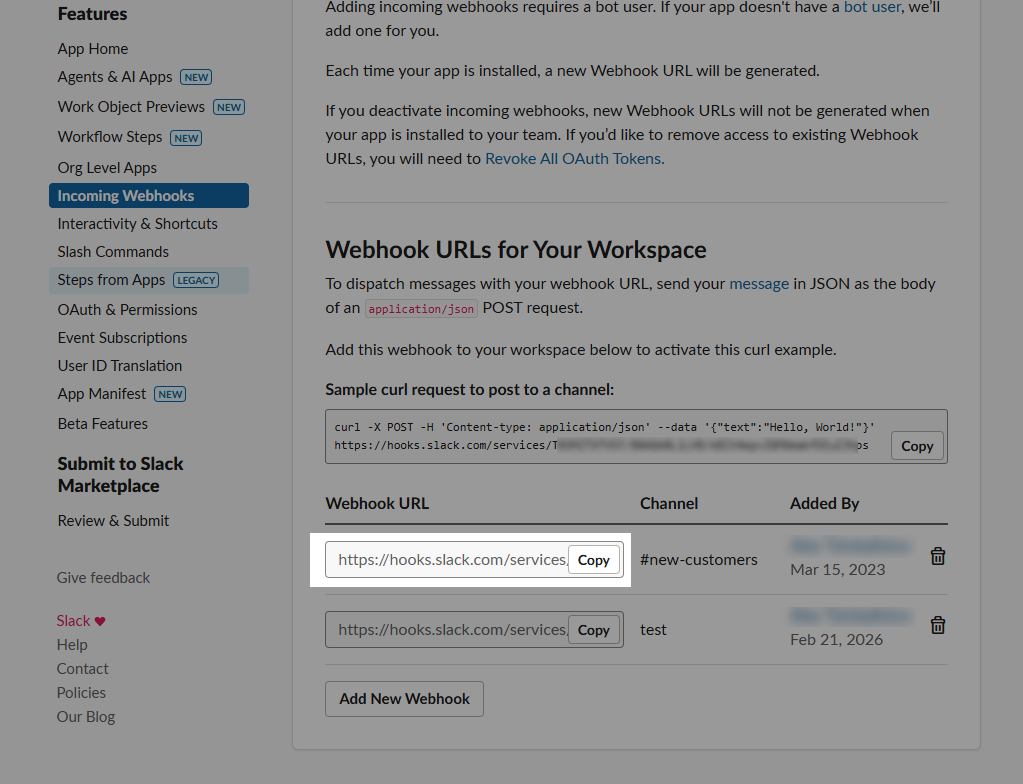
- Choose the channel you want to post to (e.g.
#inbound-leads) and click Allow. - Copy the generated Webhook URL — it looks like:
https://hooks.slack.com/services/T.../B.../xxx...
Paste this URL into:
- Zapier: the “Webhook URL” field in the Slack → Send Channel Message action (or use Zapier’s native Slack integration)
- Make: HTTP Request → URL field (method: POST, body: JSON with
textkey) - Lead Form plugin: the “Slack Webhook URL” property in Framer
Security: treat your Slack webhook URL like a password. It bypasses all login — anyone with the URL can post to your channel.
How to set up Discord channel notifications
Discord supports incoming webhooks per channel. The setup takes about 60 seconds.
- Open Discord and navigate to the channel you want notifications in (e.g.
#leads). - Click the Edit Channel (gear icon) next to the channel name.
- In the left sidebar, click Integrations → Webhooks.
- Click New Webhook, give it a name (e.g. “Lead Form”), and optionally set an avatar.
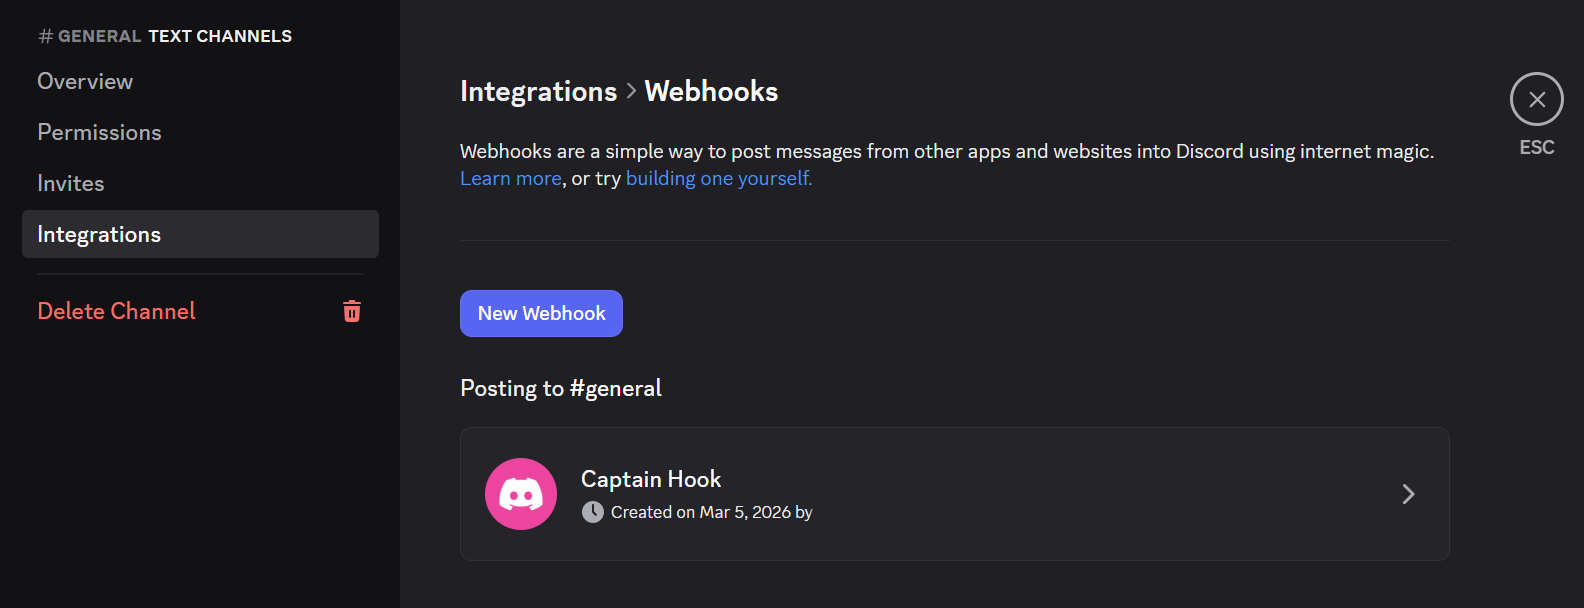
- Click Copy Webhook URL — it looks like:
https://discord.com/api/webhooks/{id}/{token}
Sending a message via Zapier or Make:
Discord webhooks accept a JSON POST with a content key for plain text, or embeds for rich cards.
Zapier:
- Add a Webhooks by Zapier action → POST.
- URL: your Discord webhook URL.
- Data: set Payload Type to JSON, add key
contentwith value like:
New lead (score: {{score}}) — {{email}}
Make:
- Add an HTTP → Make a request module.
- Method: POST, URL: your Discord webhook URL.
- Body type: Raw, Content type: application/json.
- Body:
{
  "embeds": [{
    "title": "New Lead Submission",
    "color": 6553855,
    "fields": [
      { "name": "Score", "value": "{{score}}", "inline": true },
      { "name": "Email", "value": "{{answers[1].value}}", "inline": true }
    ]
  }]
}
Lead Form plugin: once Discord delivery is added to the plugin (coming soon), paste the webhook URL into the “Discord Webhook URL” property in Framer.
Security notes (don’t skip this)
- Treat webhook URLs like passwords. Anyone with the URL can potentially post data into your automation.
- Use https:// webhooks only.
- Minimize PII. Don’t ask for phone numbers or sensitive details unless you truly need them.
- If you build your own webhook receiver (instead of Zapier/Make), Framer supports signature verification with a secret so you can confirm requests are genuinely from Framer: https://www.framer.com/help/articles/framer-form-webhook-setup/ (see “How to secure webhook destinations”).
- Consider basic anti-spam measures (honeypot field, rate limiting, and blocking obvious bot traffic) if you start getting abused.
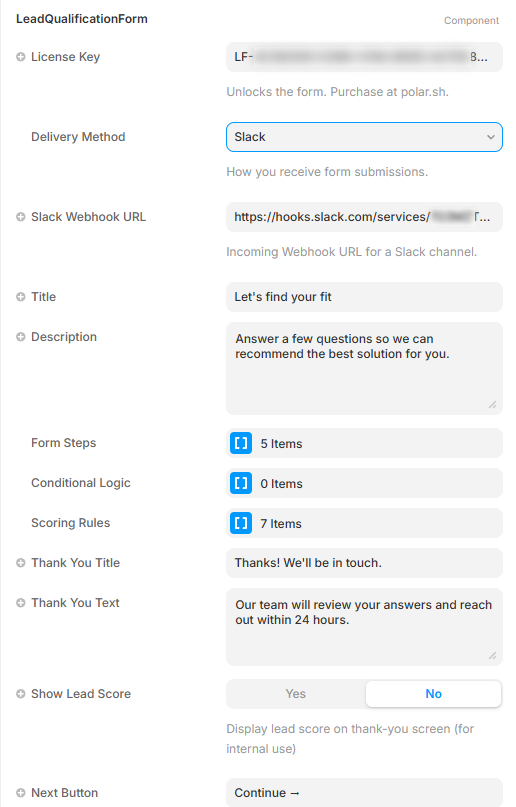
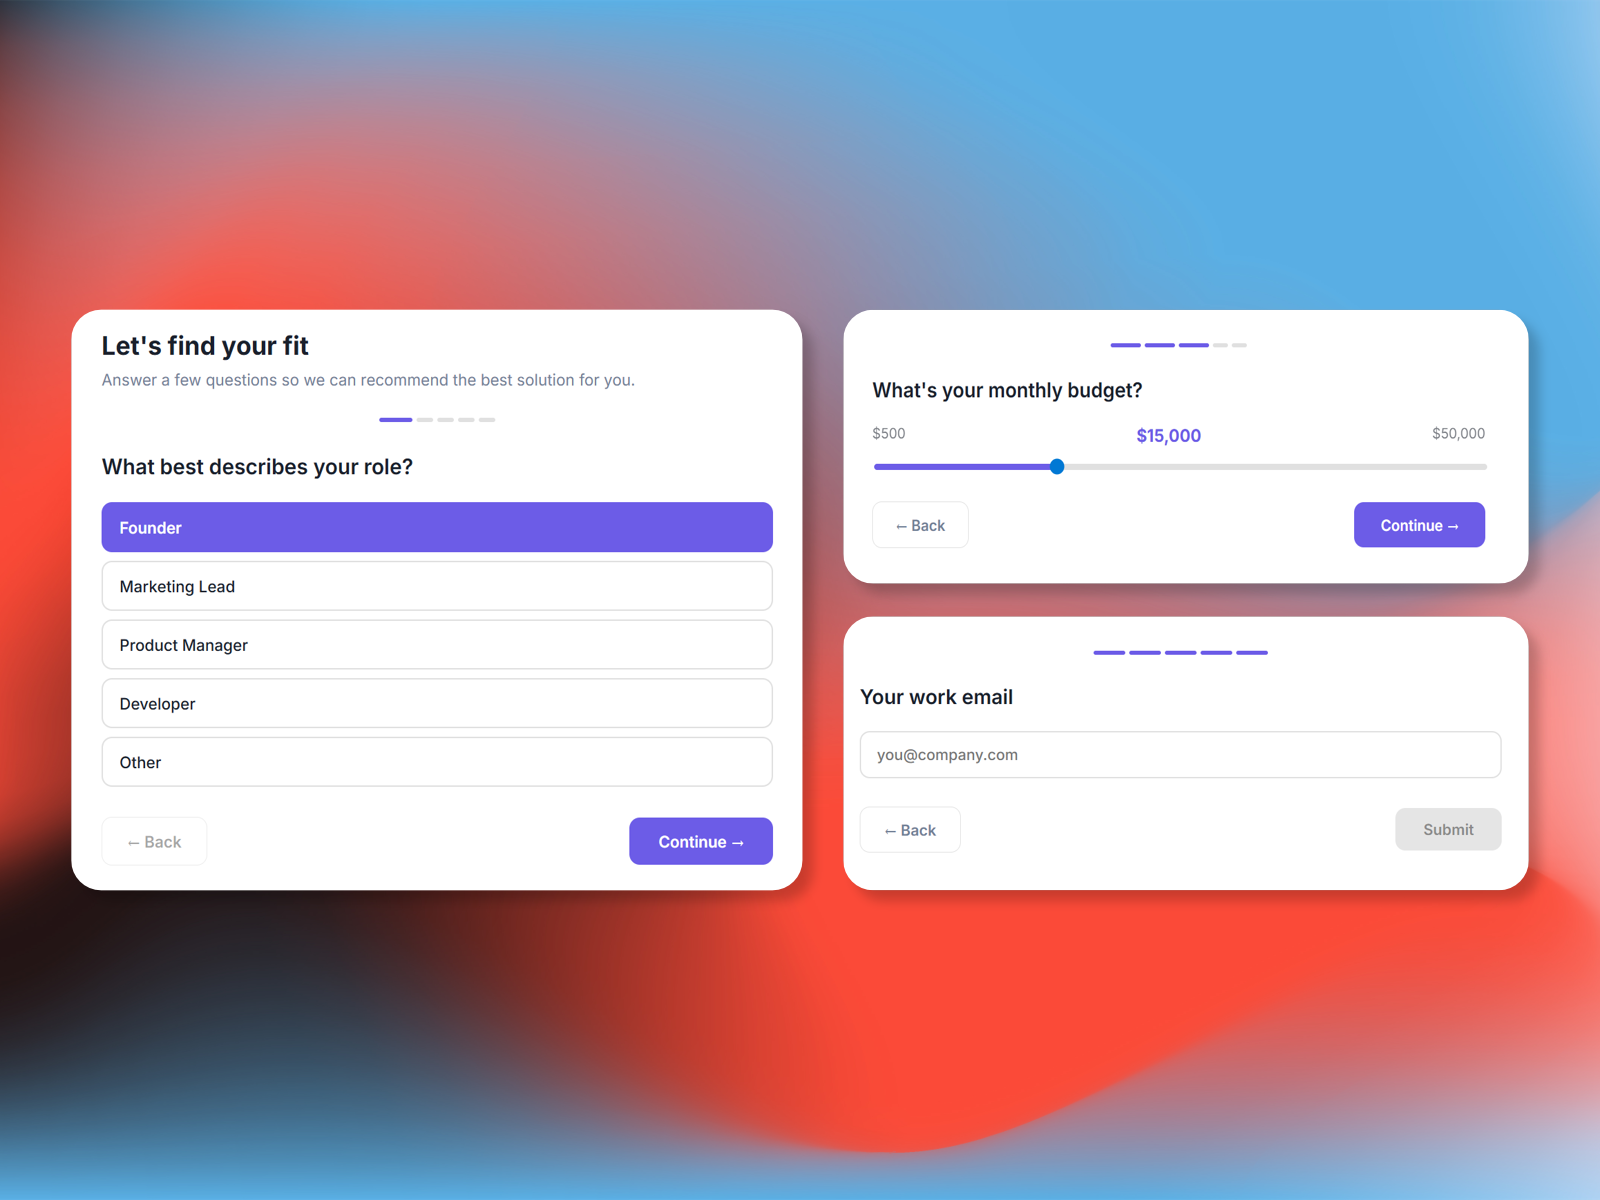
Part 4 - The faster path (optional): Lead Form plugin
If you want the same end result but with fewer moving parts, Lead Form is a turnkey option:
- multi-step form builder
- conditional questions
- routing rules
- Slack delivery
- Webhook delivery (so you can forward to email/CRM with Make/Zapier if needed)
Lead Form ($9/month, cancel anytime): https://codeperfect.gumroad.com/l/lead-form
Suggested qualification questions (copy/paste)
Start with these:
- What best describes you? (Freelancer / Small agency / In-house team / Enterprise)
- Approx budget? (Under $5k / $5k-$20k / $20k+ / Not sure)
- Timeline? (This month / Next quarter / Just exploring)
- One sentence about the project
Rule of thumb: ask the minimum up front, then follow up with more detail only when it’s worth it.
Checklist
- 3-5 fields max on the first step
- One clear CTA (avoid “Submit” - be specific)
- Mobile-friendly spacing
- Slack routing for high-intent leads
- Email fallback for everything else
Get Lead Form (optional)
If you want the “done-for-you” version of this workflow:
Lead Form ($9/month, cancel anytime): https://codeperfect.gumroad.com/l/lead-form